Replacing the custom certificates on vCenter server appliance 6.0 under embedded platform service controller

Today we will go through step by step procedure on replacing Custom certificates using Certificate Manager on vCenter server appliance 6.0
Replacing certificates on vCenter 6.0 is very simple and easy compared to replacing certificates on vCenter 5.5.
Find the below path to access the certificate manager tool.
- vCenter Server: C:\Program Files\VMware\vCenter Server\vmcad\certificate-manager
- vCenter Server Appliance: /usr/lib/vmware-vmca/bin/certificate-manager
There are various ways through which you get custom certs signed. If you are planning to use internal CA then Microsft CA should do the trick and for commercial CA goDaddy verisign are popular vendors.
Let us proceed with generating certs using certificate manager in vCenter 6.0 appliance.
Note:Always take a snapshot of the vCenter before proceeding further. If you have a external platofrm service controller take a snpashot of the PSC too.
There are basically two things taken in consideration.
- Replacing machine ssl certificates
- Replacing solution user certificates.
We will currently generate and replace machine ssl certificates using certificate manager.
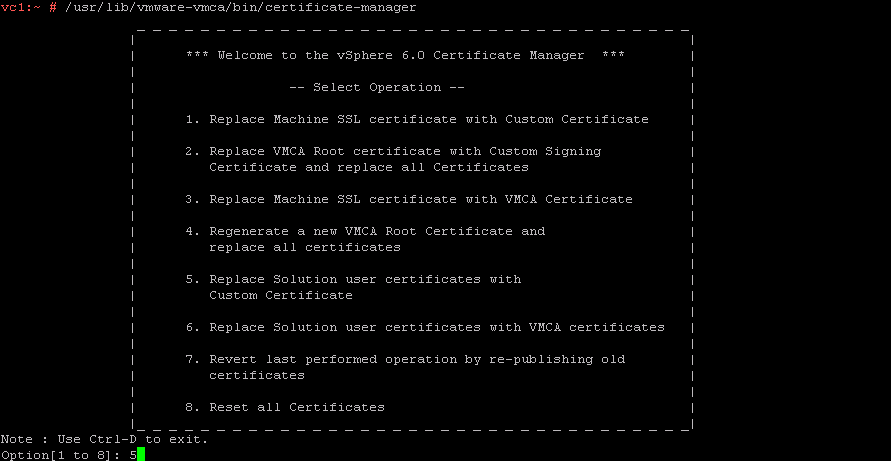
Open the certificate manager tool as per below screenshot
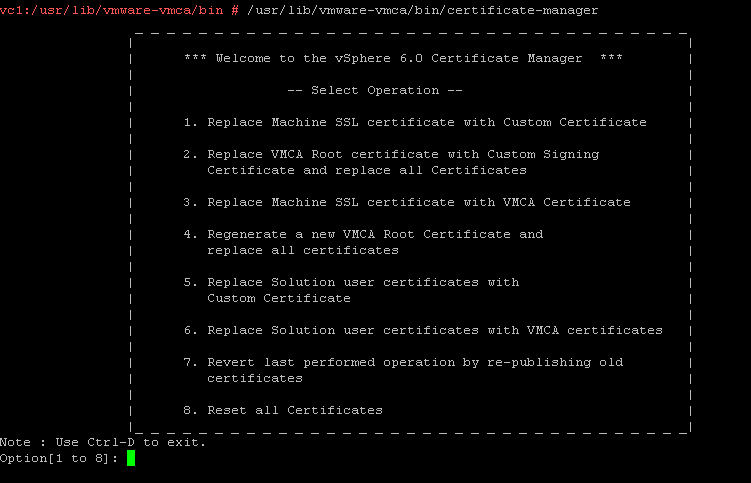
Select Option 1 and provide the SSO administrator credentials to proceed further.
Select Option 1 to generate CSR and Key for Machine ssl certificate
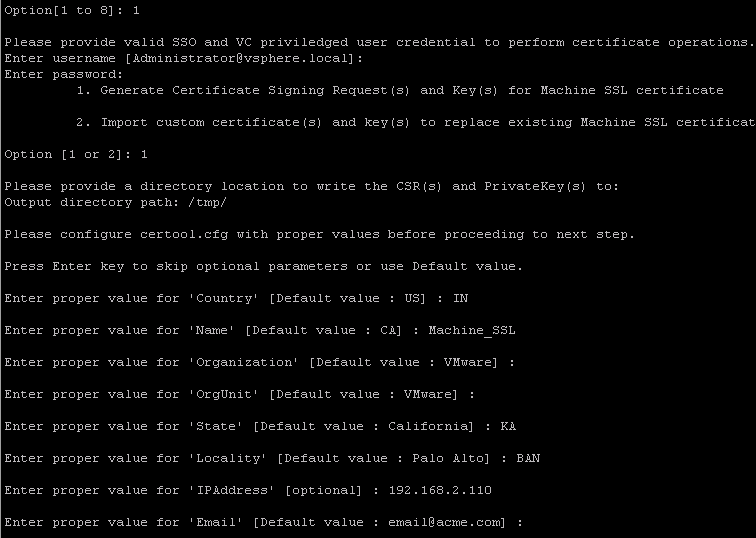
Provide the relevant details and under the Name field provide a meaningful name for your understanding in the current eg I have set it as machine_ssl
Output directory path would be to specify where these files would be generated. I have currently set it to /tmp
Fill In required details like Country,Name,Organization as per your understanding.
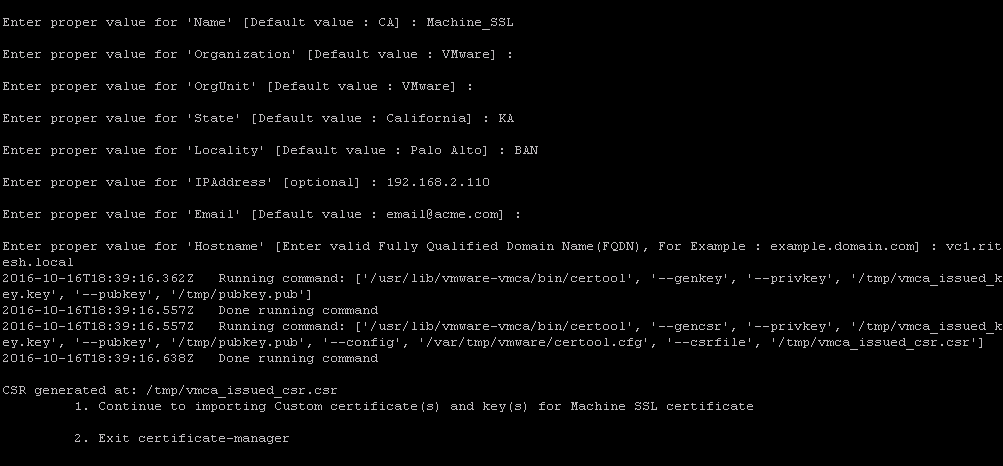
Once the certificate have been generated as per below screenshot you need to sign it using your certificate authority.
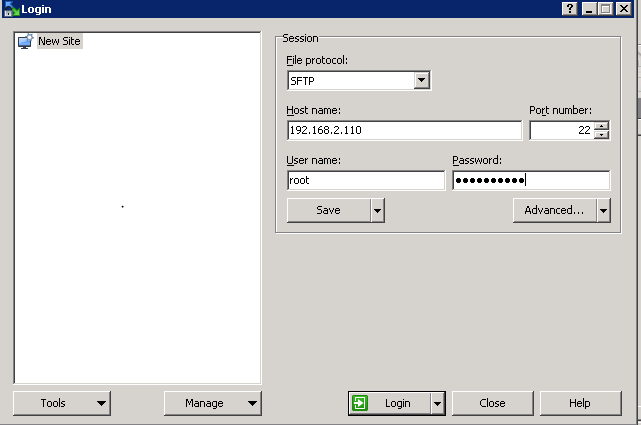
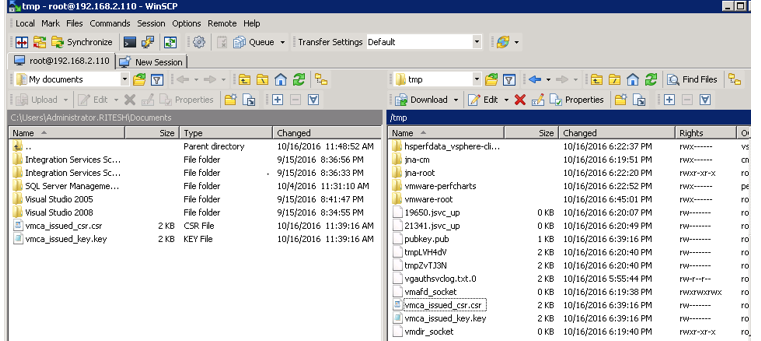
Use winscp to copy the certificates off to your windows machine from vCenter appliance. By default current shell available in vCenter appliance would not be compatible. In order to connect via winscp please use the below work around.
Alternative work-around to change the shell for root:
chsh -s /bin/bash root
This command changes the default shell from /bin/appliancesh to /bin/bash. Users can connect with WINSCP without getting the too large packet error.
To return to the Appliance Shell, run this command:
chsh -s /bin/appliancesh root
Copy the csr file on to your machine.
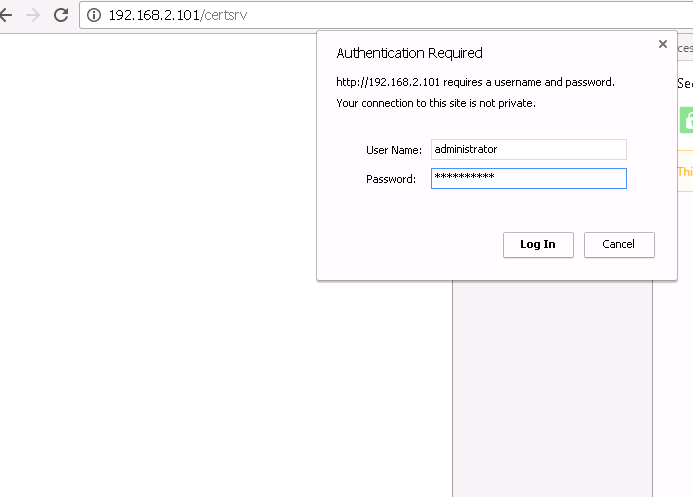
Certificates have been copied to your machine. Now go ahead and connect to your CA server in order to sign the underlying certificate as per below screen shot.
Locate the certificates generated from certificate manager in order to sign it using internal CA.
Open the csr file generated and copy the contents by open the file using notepad
In current scenario the file name that needs to accessed would vmca_issued_csr.csr(machine_ssl)
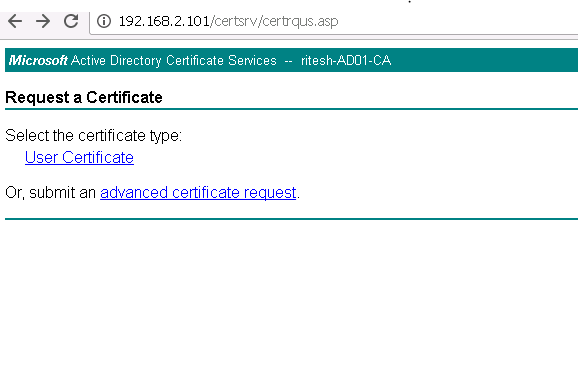
Click on advance certificate request
Paste the contents copied from csr file on to below text field as per below screenshot.
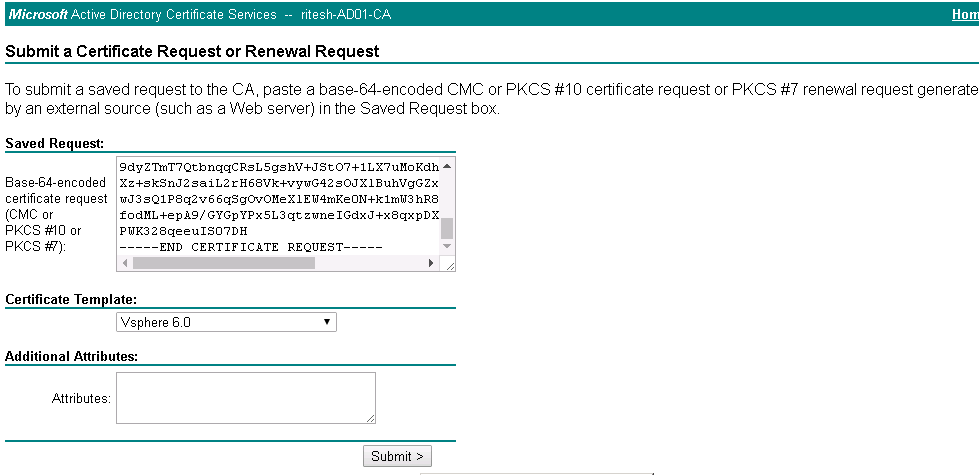
Select the appropriate certificate template. For creation of the templates in CA server follow the instruction provided in below link
https://kb.vmware.com/kb/2112009–> Creating a Microsoft Certificate Authority Template for SSL certificate creation in vSphere 6.0
Template created in the current eg would be vsphere 6.0
Click on submit.
Once clicked on submit, select Base 64 encoded.
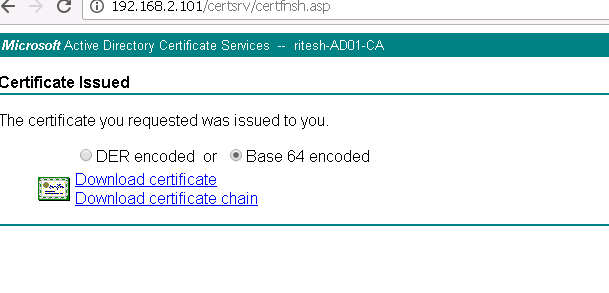
Download the certificate and save it as machine.cer for your understanding.
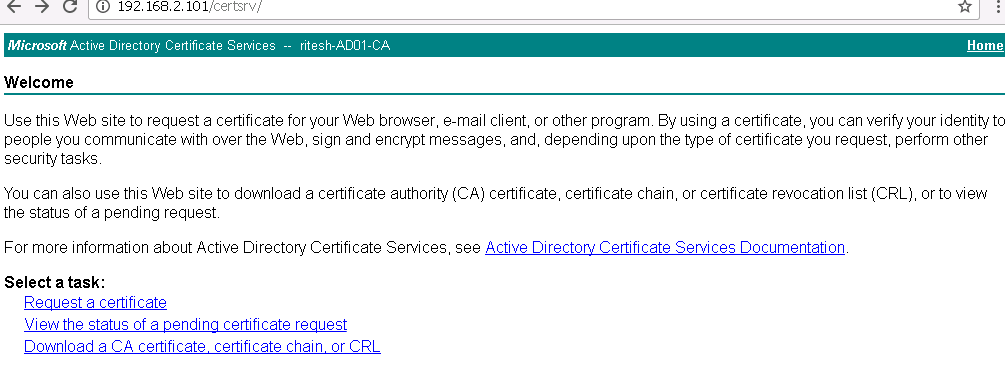
Now we have the signed cert and we need to download the root certificate,.
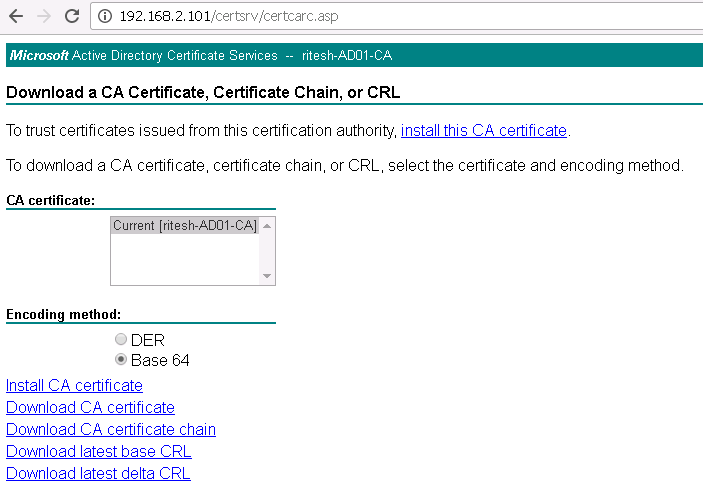
Go to home page and select the third link , download a CA certificate, certificate chain or CRL.
Select the base64 encoding method and download CA certificate.
—————————————————————————————————————————————
If you have intermediate or subordinate CA, download certificate chain else go ahead and download CA certificate. Save it as chain.pem.
If you have intermediate or subordinate CA you have to first place the intermediate cert followed by the root cert in order to create a chain file. Else download the certificate chain and export subordinate and root ca individually. You would have 2 certificates subordinate and root.
Go to command prompt
Go through the path where root and subordinate (intermediate) certs are currently available .
Run the command
Copy suborindate.cer root.cer chain.pem
You would have a new file called chain.pem created. Ensure you open chain.pem file and remove the additional space in the end. Cursor should be last placed at below mentioned line.
—–END CERTIFICATE REQUEST—–
You should not have additional line or space after the last “–“ in the above line.
Or open a new notepad, Copy the contents from subordinate and root (subordinate would be followed by root) and save it as chain.pem
—————————————————————————————————————————————-
Note:Above steps are applicable if you have subordinate CA else you can rename root certificate to chain.pem
Once we have the signed certificates and the root certificate(chain.pem) copy those two files back to appliance where you had originally generated the certificates using certificate manager.
Go back to the appliance and replace the ssl certificates using option 2
Once option 2 has been selected. You need to provide input for 3 files in order to replace the machine ssl certs from default to custom
- Signed certificate
- Private key (create during generation of csr file) in the current eg vmca_issued_key
- Root certificate(renamed to chain.pem in current eg)
Refer the below screenshot for better understanding.

Proceed by typing ‘Yes’ to continue operation.
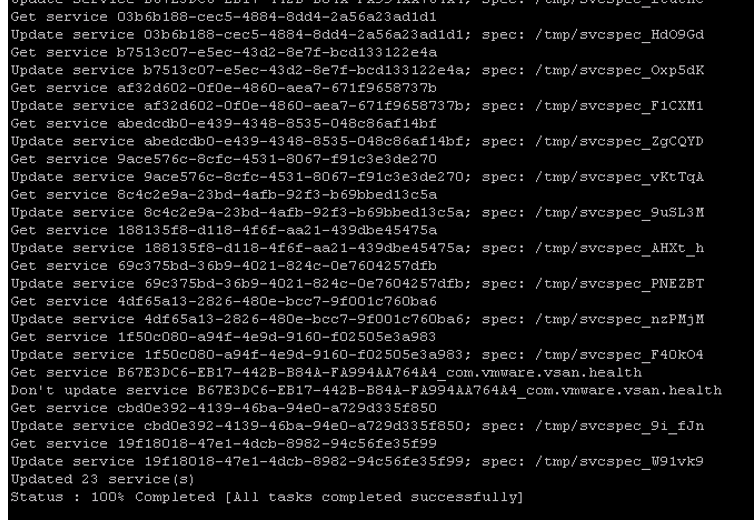
Replacement would certainly begin and you could witness services being updated. If none of the services are updated it implies certificate has not been replaced.
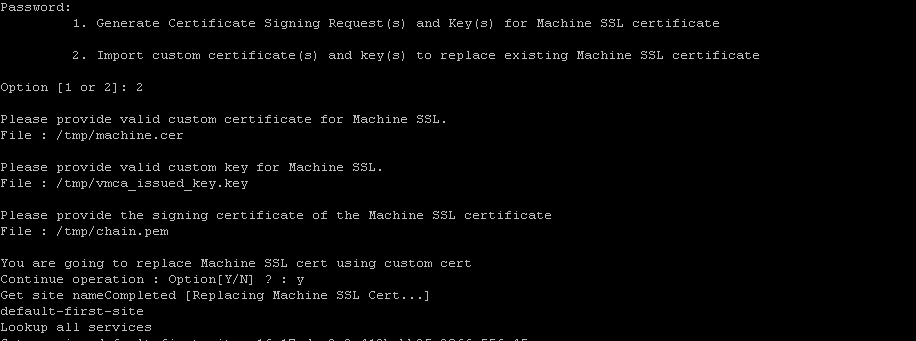
You could verify 23 services have been updated and machine SSL certificate has been replaced successfully.
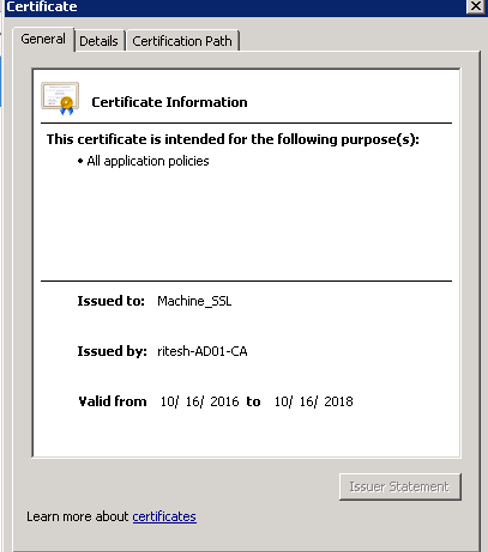
Just to validate access https://vcenter_FQDN:443 and verify the current certificates
The same set of procedure needs to be followed while replacing solution certificates.
Generate certificates for every service which would generate 2 set of files(cer&key) ensure to provide a unique name during generation of these certificates.
Note: If you do not chose a unique name for every service you cannot go ahead to replace them. So in order to differentiate we choose the ‘name’ field . However any fields can be chosen but we need to ensure that they have at least one unique value.
Every service woud provide you list of informtion that needs to be filled. Solution user contains four services
- Machine
- Vsphere-webclient
- Vpxd
- Vpxd-extension
Every service would populate below set of fields ensure to use unique name as per appropriate service.
you would have set of 2 files each at the end of the generation
- machine.cer
- machine.key
- vpxd.cer
- vpxd.key
- vpxd-extension.cer
- vpxd-extension.key
- vsphere-webclient.cer
- vsphere-webclient.key
Once certificates are generated get it signed by the internal CA and later replace as per appropriate service.
Generation and replacement of solution users certificate using custom certs would be Option no 5.
as per below screenshot.
Thank you for the detailed write-up! Very helpful.